At this point in time, you can think of LibreOffice (“LO”) as a suite of related programs:
LibreWriter (“Writer”) – the program for creating documents, like letters and books and mailing labels
LibreCalc (“Calc”) – the program for working with spreadsheets
LibreBase (“Base”) – the program for managing databases
Before data can be imported into a LibreWriter document via merge fields, we need an existing database of data, and that database needs to be registered in LibreOffice as a LibreBase database. You can look to see what databases are already registered with LO. To do this, from any LO app (Writer, Calc, Base, Draw, Impress, Math), click on Tools / Options / LibreOffice Base / Databases. You likely have a Bibliography database already registered. There may or may not be others. You can now close this window.
A database can be created and/or registered in LO in several different ways, but what we’ll do is create a Calc spreadsheet, and then register it as a database.
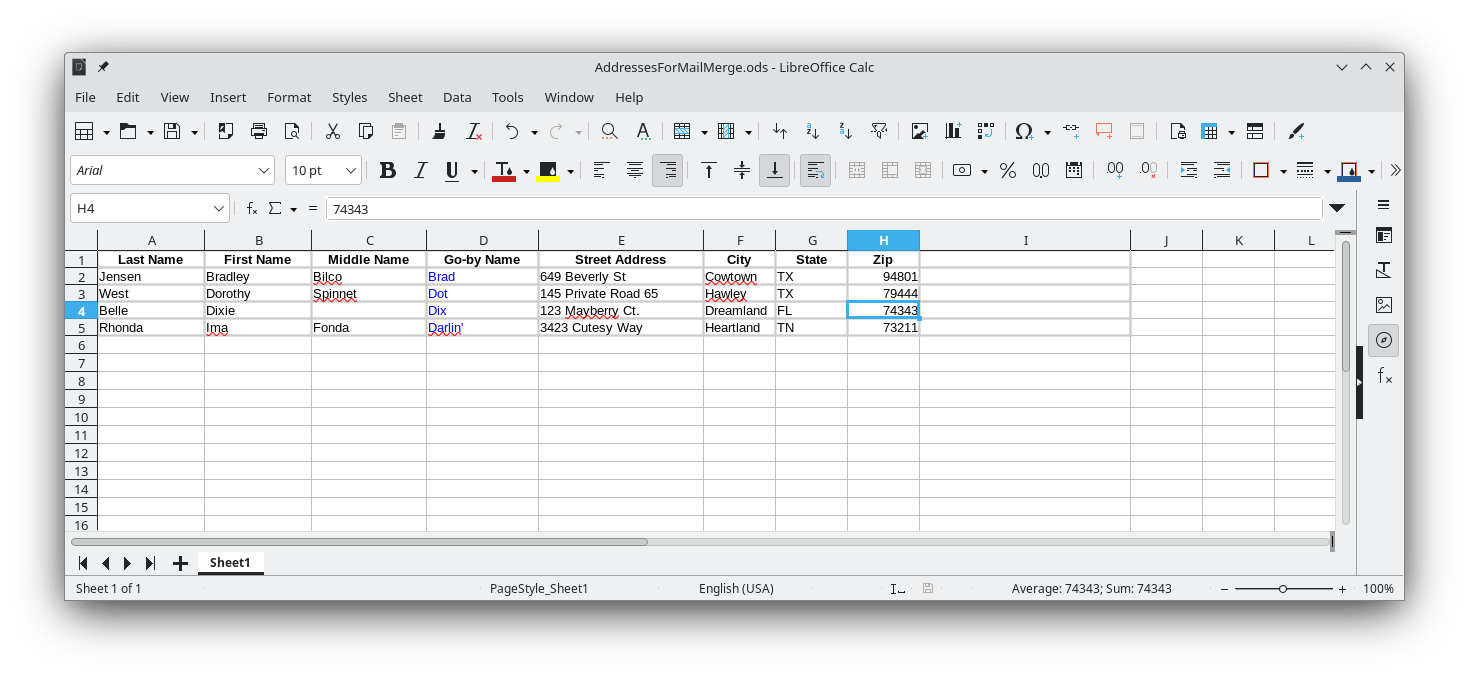
We’ll use Calc to create our database, a spreadsheet of addresses. You probably already know the basics of using a spreadsheet. Create one that looks like the spreadsheet below:
| Last Name | First Name | Middle Name | Go-by Name | Street Address | City | State | Zip |
| Jensen | Bradley | Bilco | Brad | 649 Beverly St | Cowtown | TX | 94801 |
| West | Dorothy | Spinnet | Dot | 145 Private Road 65 | Hawley | TX | 79444 |
| Belle | Dixie | Dix | 123 Mayberry Ct. | Dreamland | FL | 74343 | |
| Rhonda | Ima | Fonda | Darlin' | 3423 Cutesy Way | Heartland | TN | 73211 |
| Here’s the data in a copy-able format. |
Save this file in a place you can find it later, perhaps in a folder named “Documents/merge_tinkering”, and name the Calc document something like “Addresses.ods”.
Now we need to register this spreadsheet with LO as a Base database.
There are several ways of doing this, but we’ll only look at one.
From any of the LO apps, click on File / New / Database
On Step 1: Select Database, click on Connect to an existing database, change the pull-down to Spreadsheet, and then click on Next.
On Step 2: Set up Writer Document or Spreadsheet Connection, open your “Addresses.ods” spreadsheet, and click on Next.
On Step 3: Save and Proceed, make sure to select Yes, register the database for me, and deselect Open the database for editing. Then click Finish. You’ll be asked to save the database file; I suggest putting it in the same directory as your spreadsheet file, and naming it “addresses.odb”.
If you look in LO’s Options again at your registered databases, you’ll now see this new database listed. If you use your operating system’s file manager to look at the directory where you stored the spreadsheet and database files, you’ll see they’re just normal, everyday file-system files. However, the database file (the “.odb” file) is tied to the spreadsheet file, so that if you change the spreadsheet, the database file will be updated to match when the database file next gets accessed by an LO application.
You can also use the LibreOffice Base app as a DBMS (DataBase Management System) to look in and/or manipulate the data in the database file. From within that app, you can look in Edit / Database / Properties to see that the database file is connected to the spreadsheet file.
We now have the spreadsheet registered as a database, and now we’re ready to use the database as a source for addresses.
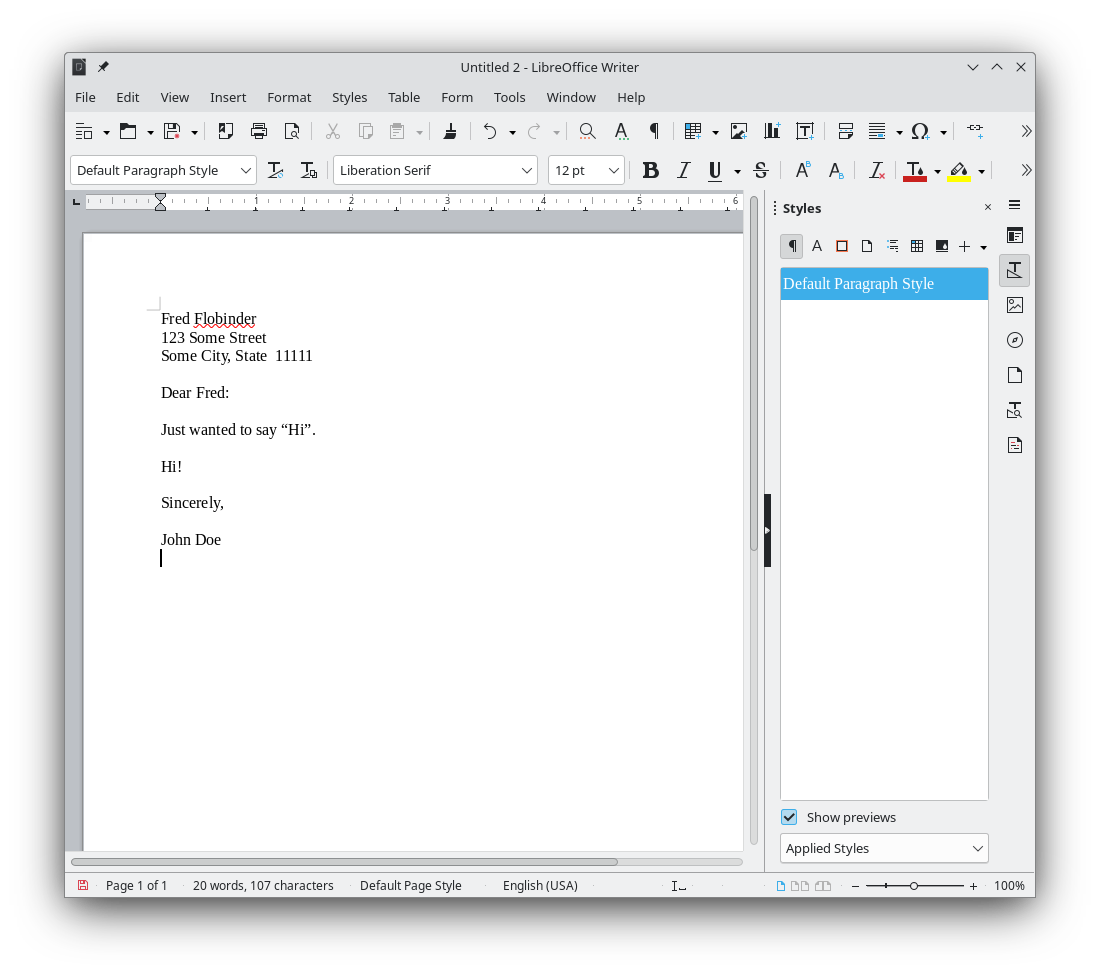
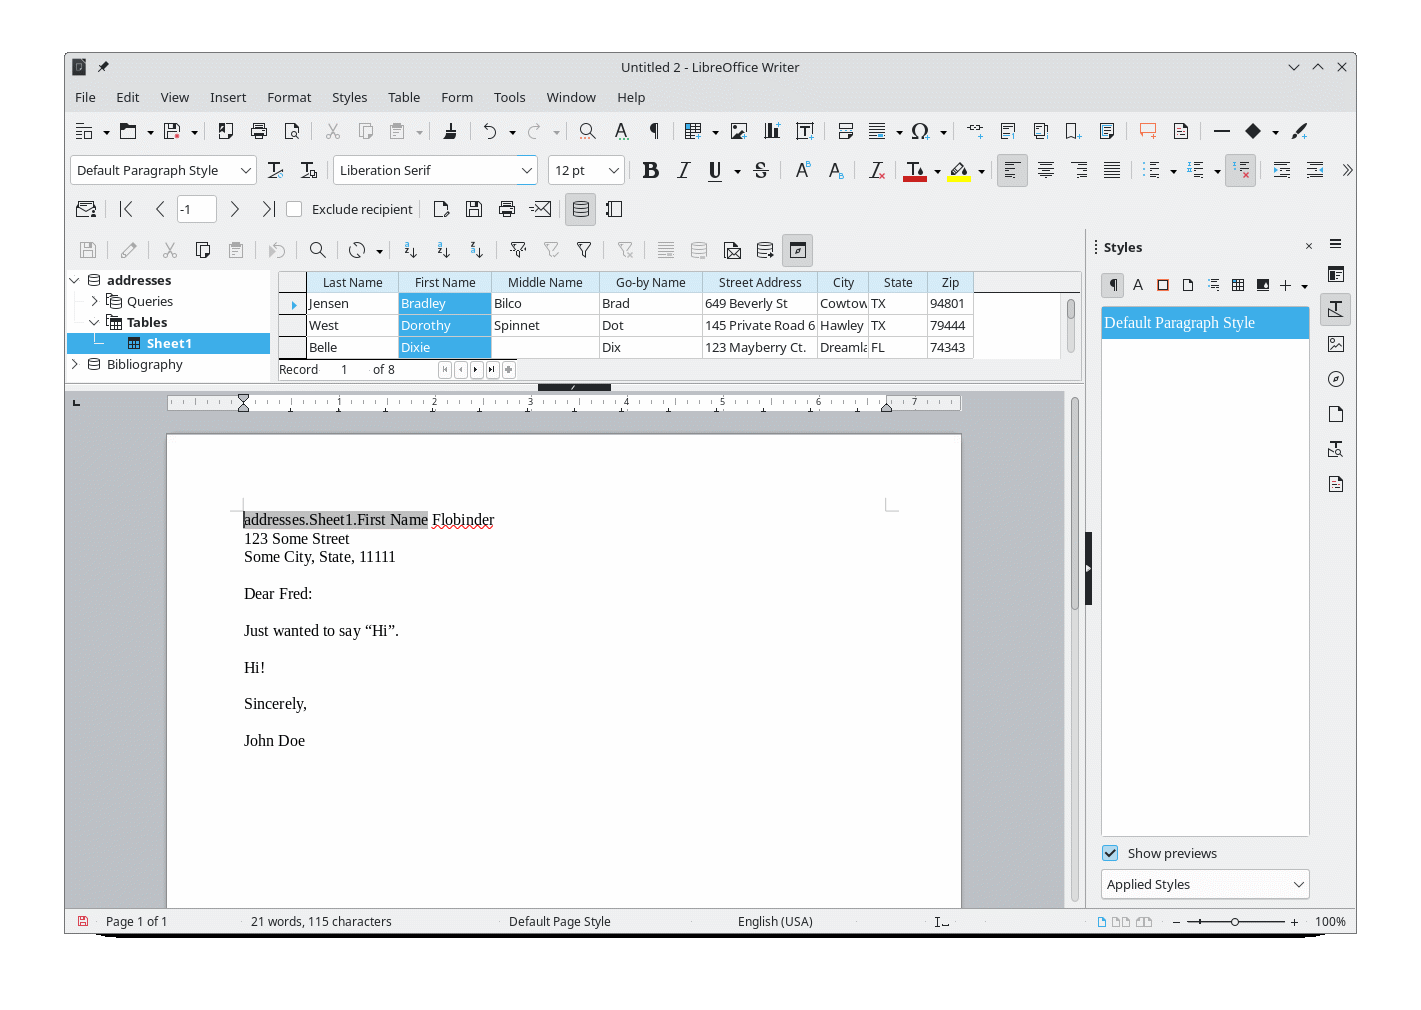
Before doing labels, let’s create a simple letter that has a mailing address at the top, a salutation, a simple body, and a signature, like so:
If we wanted to create four letters, each customized with the information from our addresses database, we need to replace the address information with merge fields from our registered database.
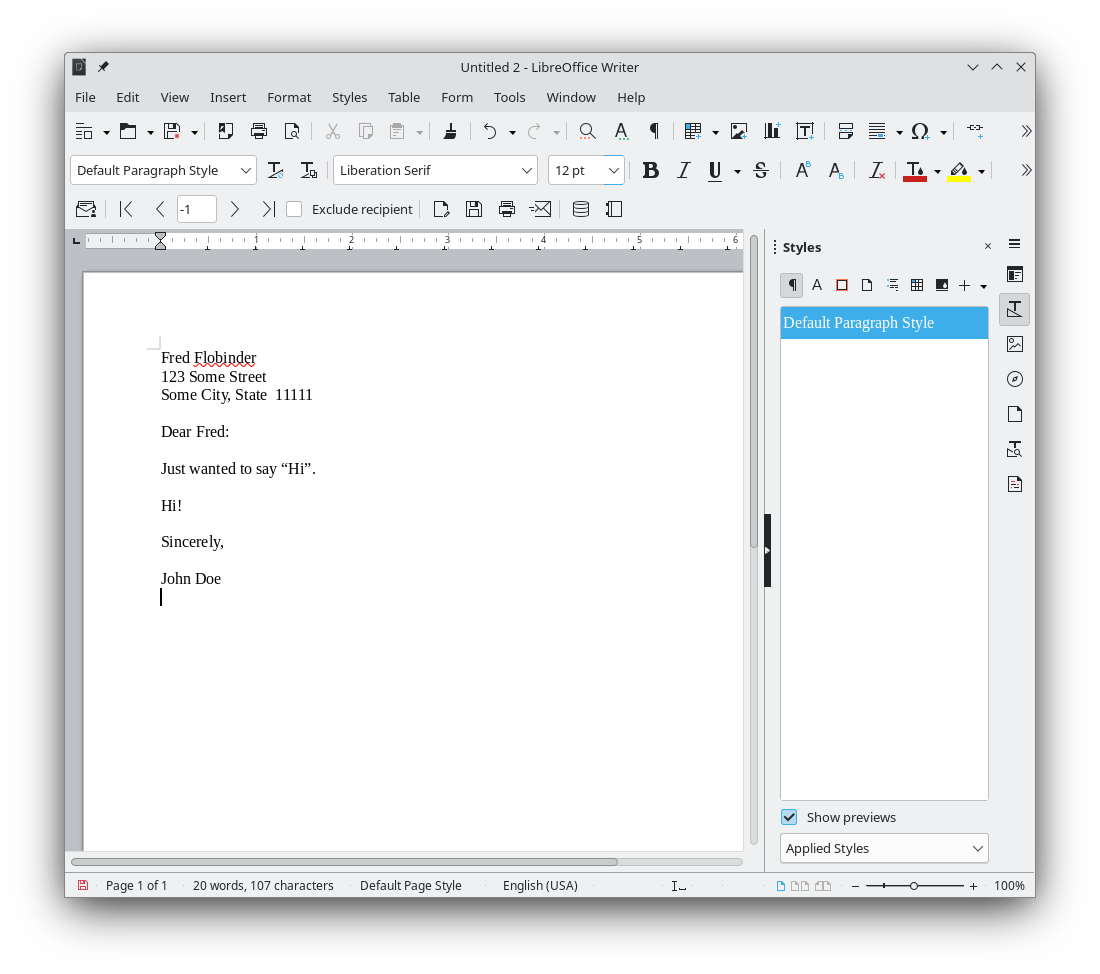
Click on View / Toolbars, and make sure that “Mail Merge” is checked. This should add the Mail Merge toolbar to your Writer window, as seen below:
Then click on the next-to-the-last icon on that toolbar, the “Data Sources” icon. This will open two new window areas. The left-most area has a file-explorer type of mechanism showing your registered databases. One of them should be “addresses”.
Click on the arrow next to “addresses” to expand that branch. You should now see “Queries” and “Tables”.
Click on the arrow next to “Tables” to expand that branch. You should now see “Sheet1”.
Click on “Sheet1”, and the second area should become a mini-spreadsheet window, showing your spreadsheet data.
If you scroll to the bottom of that data, you’ll see that “Fred Flobinder” is not in that data. Let’s go add him to the spreadsheet. Open your spreadsheet in Calc and add his information, and then save the spreadsheet.
Back in Writer, you’ll notice that Fred still does not show up in the mini-spreadsheet window. On the Mail-Merge toolbar is a Refresh/Rebuild button, that I would have expected to refresh this window, but it doesn’t. However, you can force a refresh by clicking again on the “Data Sources” icon, to close these two windows, and then click on the icon again to reopen them. Navigate again to “Sheet1”, and the mini-spreadsheet window should now show Fred as being part of your data.
Now, in the body of the form letter, delete the name “Fred”.
Then click-and-drag the heading “First Name” from the mini-spreadsheet window to where the name “Fred” used to be. The results should look like this:
Do the same thing with “Last Name”, “Street”, “City”, “State”, and “Zip”, to look like this:
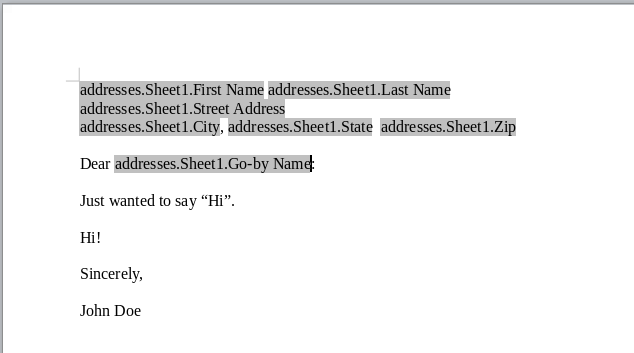
Notice I left a space between the first and last name fields, and wherever else appropriate, as well as the comma.
Notice also that for the salutation I put the “Go-by name”.
Now, on the Mail-merge toolbar, click on the “Edit Individual Documents” icon. This will generate a new document in a new window, composed of a new page for each record.
Notice, however, that Fred’s letter did not get a salutation (at least with version 7.4.7.2 of LO). Fred does not have a “Go-by” name in the original spreadsheet; I would have expected the salutation line to say “Dear :”, not to be missing entirely. I suspect this is a bug in LO.
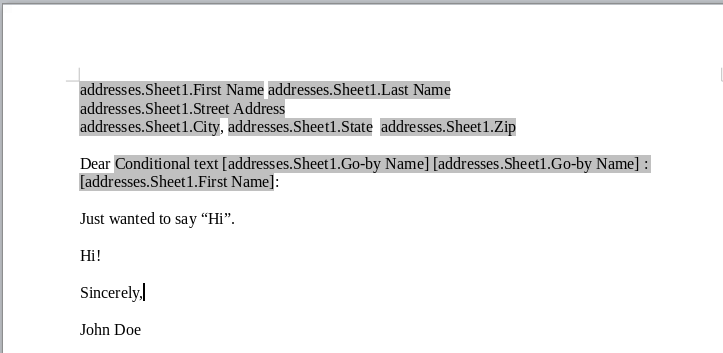
Regardless, we need to compensate for the times when the “Go-by” field might be empty. What we’ll do is put a conditional field here, that if the “Go-by” field is empty, we’ll use the first name, otherwise we’ll use the “Go-by” name.
Close the new window with its new document (we don’t need this version, and we can create a new one with the click of a button), and edit the original form letter again.
Delete the “addresses.Sheet1.Go-by Name” field.
Without moving the cursor from that spot, click on Insert / Field / More Fields
In the new window that opens, if you click on the Database tab, and then in the left-hand pane click on “Mail Merge fields”, in the right-hand pane is an explorer window where you can navigate to the Sheet1 fields. You can insert these fields into your form letter from here as an optional method of placing fields into your forms.
But that’s not why we’re here. Instead, click on the Functions tab. In the left-hand pane select Conditional Text.
In the right-most pane, fill in the following:
Condition:
[addresses.Sheet1.Go-by Name]
Then:
[addresses.Sheet1.Go-by Name]
Else:
[addresses.Sheet1.First Name]
Then click on Insert, then Close. (If the field names “Go-by Name” and “First Name” did not have a space, the brackets would not be necessary. Brackets are also needed if a field name has an underscore.)
When you finish, the form document should look this:
If for some reason you need to modify this conditional field, you can just double-click on the field name to get back into its editor.
The Condition means “if the addresses.Sheet1.Go-by Name field exists (that is, if it is not an empty field)"; if that condition is true, then do such-and-such.
It would be nice to include a middle name, but not everyone (Dot, I’m looking at you) has a middle name. We can use the same Conditional Text feature that we used above to include a middle name, except that we also need to include an extra space if the middle name is included, but not if the middle name is excluded. In other words, if the middle name exists, the addition will be “middle-name<space>”. But LO’sConditional Text feature won’t allow you to mix field-names and plain text in one field, so we’ll have to treat this field as two fields, both dependent on the existence of the middle name.
Place your insertion cursor just after the space following “addresses.Sheet1.First Name”, and again click on Insert / Field / More Fields. The window should open to the same location you were last in (tab Functions, option Conditional Text). Here are the settings to use:
Condition:
[addresses.Sheet1.Middle Name]
Then:
[addresses.Sheet1.MiddleName]
Else:
<leave this blank>
After clicking Insert one time only, change the Then: option to a single space, like this:
Condition:
[addresses.Sheet1.Middle Name]
Then:
<one space goes here>
Else:
<leave this blank>
Then click again on Insert. Then click on Close.
This will insert two conditional fields; one that puts in the middle name if the middle name field is not empty, and one that puts in a space right behind that middle name if the middle name field is not empty.
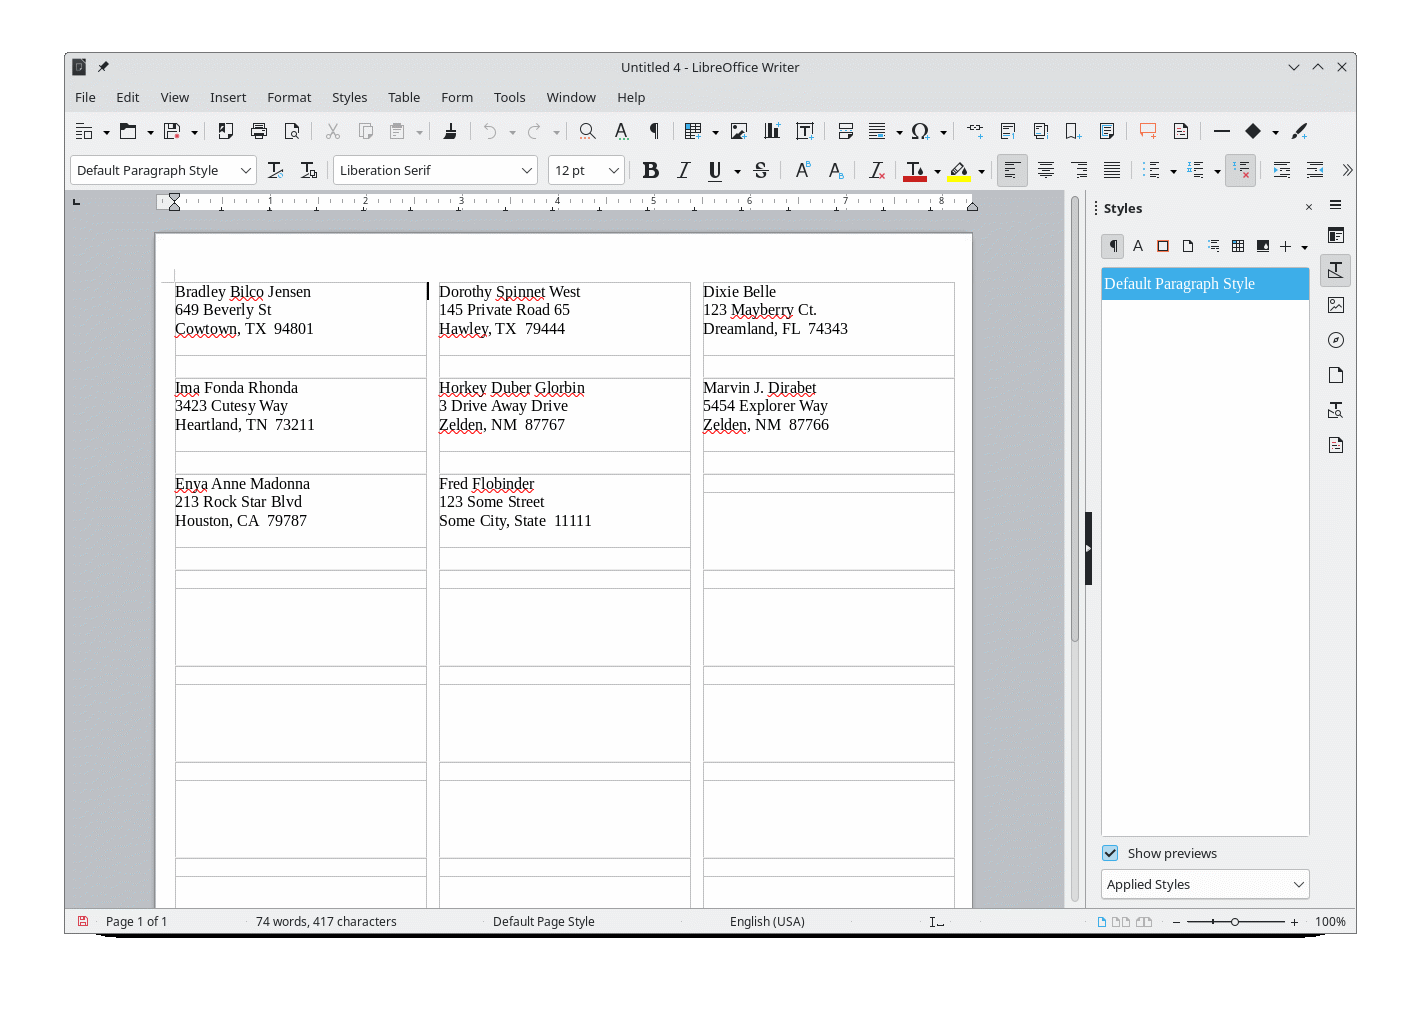
When you run the merge now, that should produce a new window containing one new document per record in your spreadsheet, with go-by names and middle names where they exist, and clean substitutes where they do not.
Creating labels is as easy as creating a bunch of customized form letters from a master form-letter template, as we did above. The only real difference is that each label gets a record from the database, instead of a new whole document getting a record from the database.
In LibreWriter, click on File / New / Labels. A new window will pop up:

This is where you define the page of labels which you will be sending through your printer. We’re going to pretend we have a ream of Avery 5160 labels. So select “Avery Letter Size” from the “Brand” field, and select “5160 Address” from the “Type” field.
If you clicked “New Document” here, you’d have a document that will print empty labels; you just don’t have any addresses on those labels. All we have to do is to merge the labels with the addresses in our address book.
Or you could enter your desired address fields here in this window. You’d just select your database, your table, your desired field, and then click on the left-pointing arrow to include that field on the label.
Let’s do it that way, and see how it turns out.
Only include the first name field, so that the window looks like this:
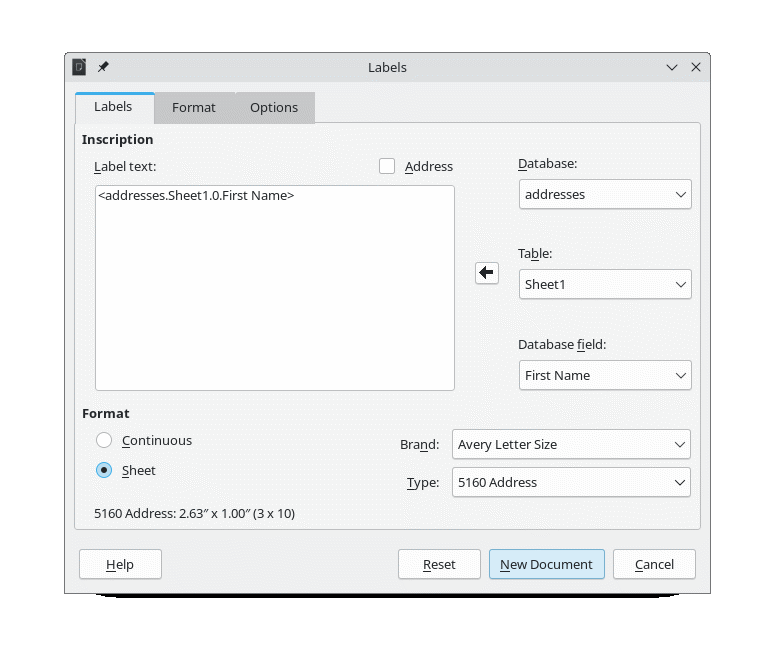
The information you type into this box becomes the information on the very first label, AKA the “MasterLabel”.
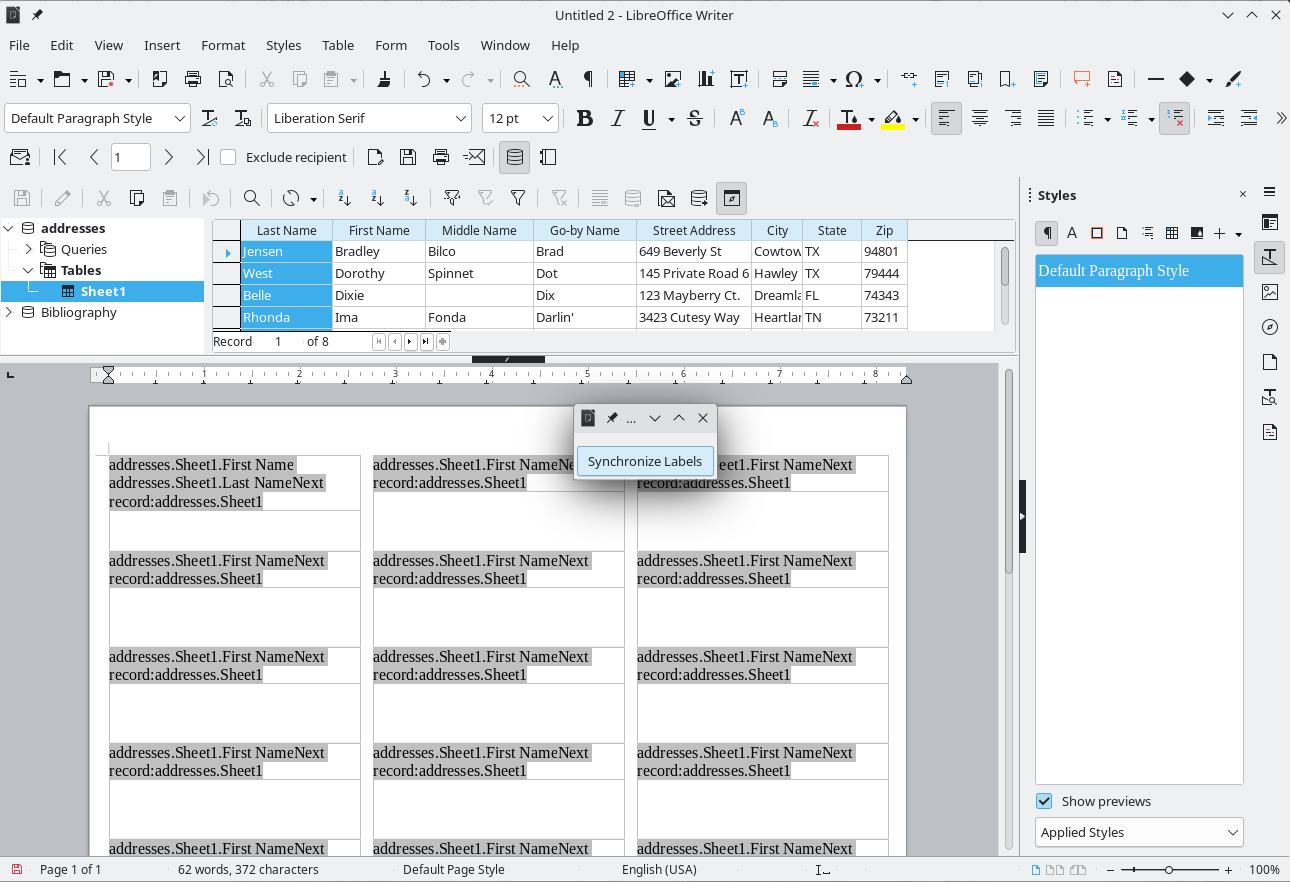
Then click on New Document. This will open a new window with a document of labels, the first few of which should be populated by the first names of your addresses. You’ll likely also see a small window with a button labeled “Synchronize Labels”; we’ll get to that in a minute.
In this new document window, the Mail-Merge toolbar should be visible. Use it to perform a merge to “Edit Individual Documents”, just like we were doing earlier. The results should look something like this (I added a few addresses to my spreadsheet):
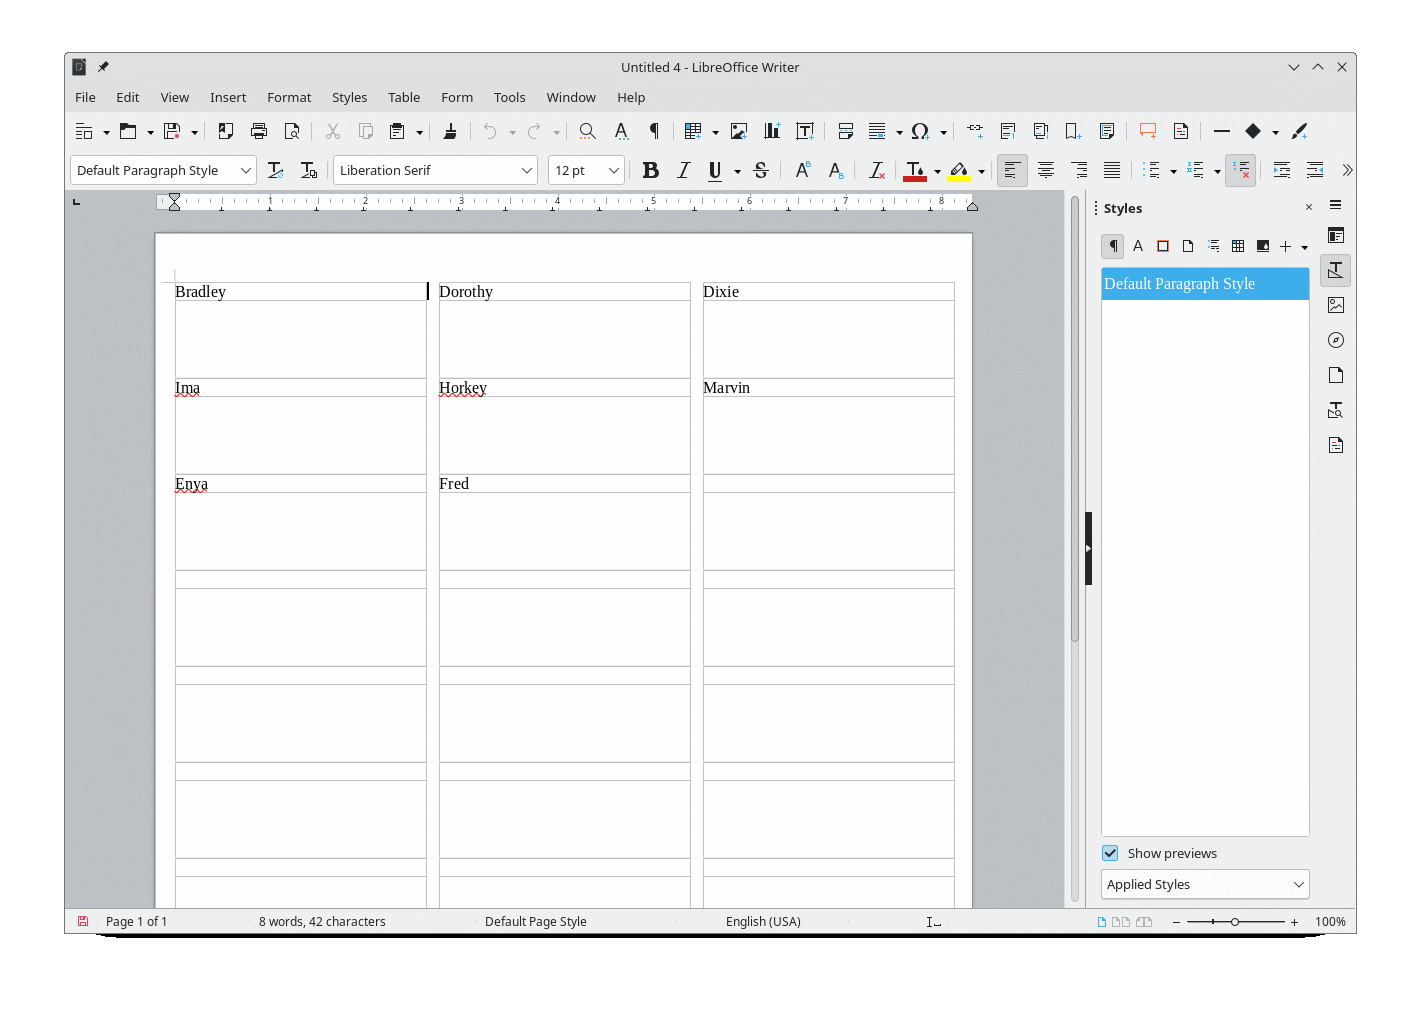
Looks good, except we want the full address. Close this newest window, and on the previous window (that has the “Synchronize Labels” window associated with it), click on the “Data Source” icon to open the mini-spreadsheet window, and place yoru insertion cursor just between the “addresses.Sheet1.First Name” field and the “Next record:addresses.Sheet1” field. Press the spacebar to add in a space, and then drag from the mini-spreadsheet window the heading of the “Last Name” field to just after this space, so the results look like below. Do not click on “Synchronize Labels”.
Go ahead and perform the merge. The results should be the same as before, except that the first label has a last name included; the others do not. To fix this…
Close this most recent document window, and on the previous window, with the “Synchronize Labels” button, click on the “Synchronize Labels” button.
This should synchronize all the labels on the page to match the first label.
Now do your merge, and it should be as you expected it to be, with each label having a first and a last name.
What if you needed four labels of the second address, but one of the others? Remove the “Next record:address.Sheet1” field from the second, third, fourth, and fifth label, and do not “Synchronize Labels”. Do your merge, and voila!
However, I bet you found you can not do this. In practice, you’d likely never want to do this, because it “breaks” the system. The system protects you from this, by considering each label its own write-protected section. If you place your insertion cursor in the first label, and look near the bottom right-of-center area, you’ll see the word “MasterLabel”; this first label is really the only one you want to modify. If you place your cursor on the second label, and look in that same area, it’ll say “read-only: Section1”. The third label is named “Section2”, and so on. You can overwrite the read-only protection on each individual section – just double-click on the “read only: SectionX” label, and uncheck the “Write-Protection / Protect” option – but as mentioned, in real life, you probably don’t want to do this.
To finish up, just modify the first label to be as you desire. As with the mail-merge above, you can include conditional fields to include Go-by names and middle-names, etc. Once you have the label as you want it, click on “Synchronize Labels”, and then do your merge, and you should have a sheet of labels, ready to print.
If you remove the “Nextrecord:addresses.Sheet1” field from the MasterLabel, and then synchronize and merge, you’ll get a full page of identical labels for each record in your database.
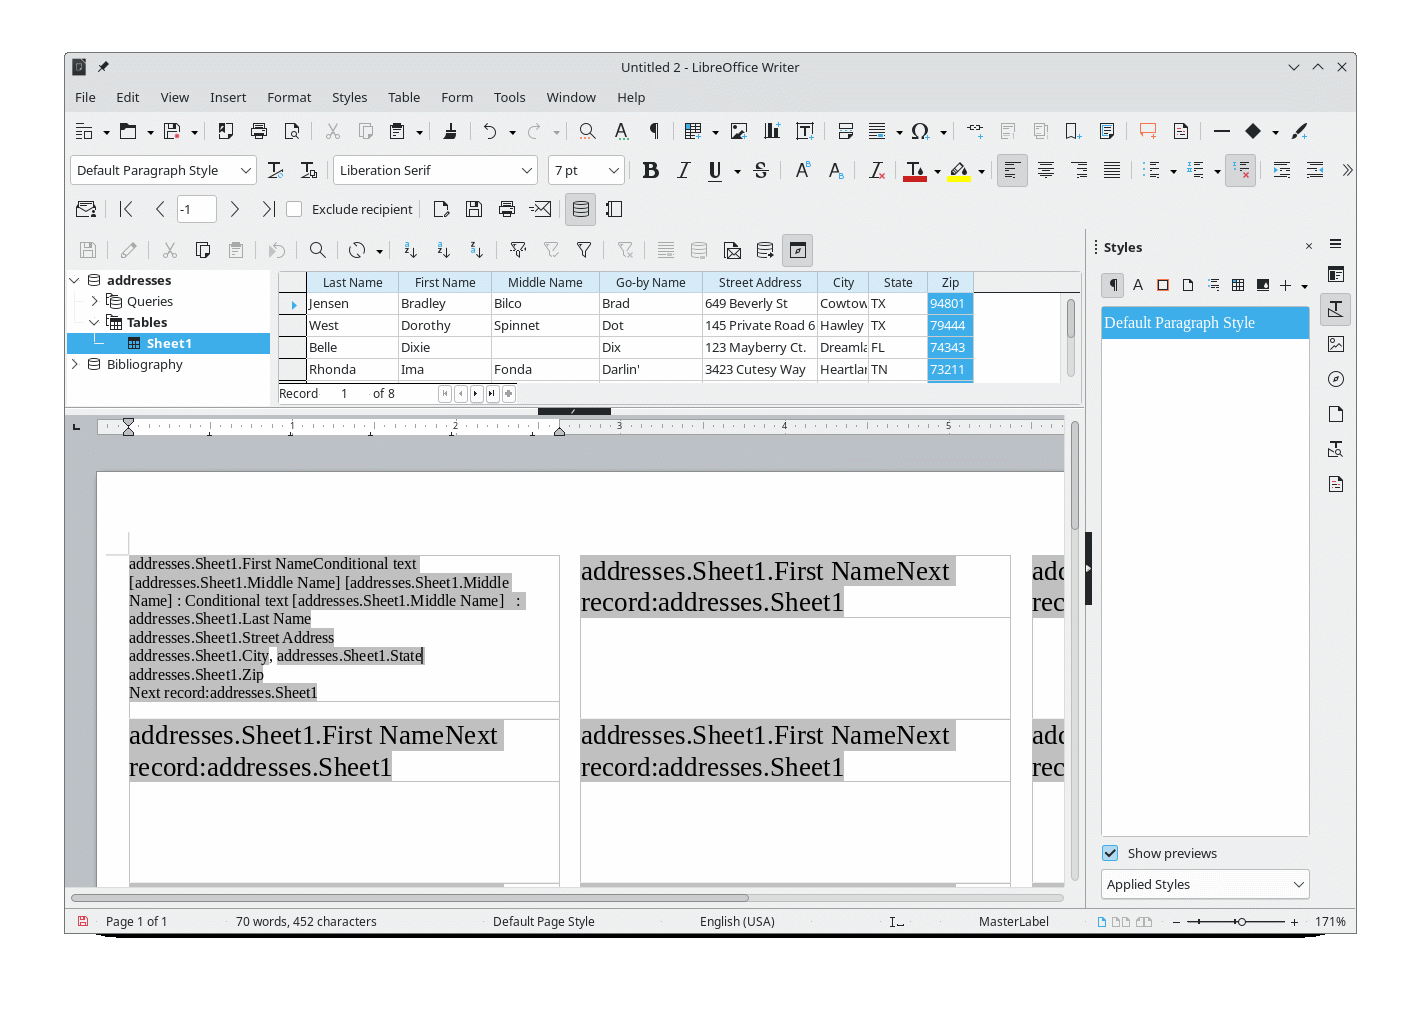
You may find it difficult to see what you’re doing once you start adding fields to the MasterLabel, because the textual information is larger than will fit visibly on a label. There’s not a great solution for this, but perhaps the best solution is to Ctrl-A select all the text in the MasterLabel and shrink it to a pretty small font, such as 7pt, and then magnify the overall window text a bit so you can see all the text on the label in a view large enough to actually see:
Once you have the MasterLabel as you want it, you can Ctrl-A all the text again, and restore it to a decent-sized font:

Don’t forget to “Synchronize Labels” before merging: